概述
本示例常见的查询页面,主要目的是演示出如何开发出一查询页面。原页面中的会用到数据坞等内容,本示例旨在演示如何开发出一查询页面,所以会对Sample Center中的示例有所精简。
本章节讲述如何开发Dorado Sample Center中的查询,目前在示例中心->分类示例->数据处理目录下面。示例链接如下:
准备工作
新建一工程query,并且配置好数据库,具体步骤参考3.1.2节。
开发步骤
添加Dataset
步骤1:新建一Common ViewModel,文件名为Query。
步骤2:添加一AutoSqlDataset,选择列表中的Employee表,且选中如下图中的字段。(具体如何添加请参考3.1.3.1节。) 
AutoSqlDataset的属性设置如下:
属性 | 值 |
|---|---|
id | datasetEmployee |
originTable | EMPLOYEE |
pageSize | 10 |
步骤3:添加FormDataset,id设置为asetCondition。添加FormDataset的Button位置如下左所示:

步骤4:选中FormDataset,添加7个BaseField,添加BaseField的按钮位置如上右图所示。这7个BaseField的属性设置如下:
Name | Value | DataType |
|---|---|---|
employee_name | 姓名(Like) |
|
sex | 性别(=) |
|
married | 婚否(=) |
|
salary1 | 薪水(>=) | int |
salary2 | 薪水(<=) | int |
birthday1 | 生日(>=) | date |
birthday2 | 生日(<=) | date |
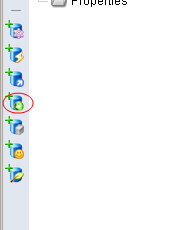
步骤5:选中datasetEmployee的子节点MatchRules,点击添加BaseMatchRule按钮,添加7个BaseMatchRule,添加MatchRule的按钮位置如下图所示:
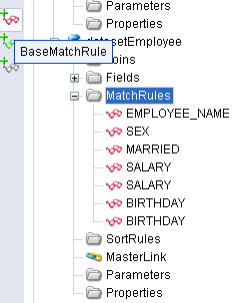
添加的7个MatchRule的属性设置如下:
dataType | escapeEnabled | Operator | OriginField | Table | Value |
|---|---|---|---|---|---|
string | true | like | EMPLOYEE_NAME | EMPLOYEE | :employee_name |
boolean | true | = | SEX | EMPLOYEE | :sex |
boolean | true | = | MARRIED | EMPLOYEE | :married |
double | true | >= | SALARY | EMPLOYEE | :salary1 |
double | true | <= | SALARY | EMPLOYEE | :salary2 |
date | true | >= | BIRTHDAY | EMPLOYEE | :birthday1 |
date | true | <= | BIRTHDAY | EMPLOYEE | :birthday2 |
添加DropDown
步骤1:添加两个ListDropDown。两个ListDropDown的属性设置如下:
属性 | 值 |
|---|---|
id | dropdownSex |
mapValue | true |
属性 | 值 |
|---|---|
id | dropdownMarried |
mapValue | true |
步骤2:dropdownSex添加3个DropDownItem。三个DropDownItem的属性设置如下:
Label | Value |
|---|---|
<忽略> |
|
男 | true |
女 | false |
步骤3:dropdownMarried添加三个DropDownItem,属性设置如下:
Label | Value |
|---|---|
<忽略> |
|
已婚 | true |
未婚 | false |
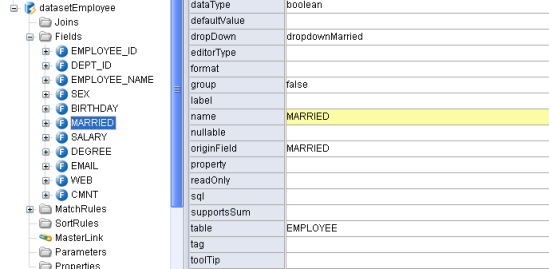
步骤4:选择datasetEmployee->Fields->Married,设置其DropDown属性为dropdownMarried。如图所示:
步骤5:用同样的方法,设置SEX字段的DropDown属性为dropdownSex。
添加AutoForm和DataTable
步骤1:添加一AutoForm,属性设置如下(具体添加步骤参见3.2.3.2):
属性 | 值 |
|---|---|
id | formCondition |
dataset | datasetCondition |
步骤2:选中formCondition的FormGroup,设置其属性如下:
属性 | 值 |
|---|---|
title | 查询条件 |
name | group1 |
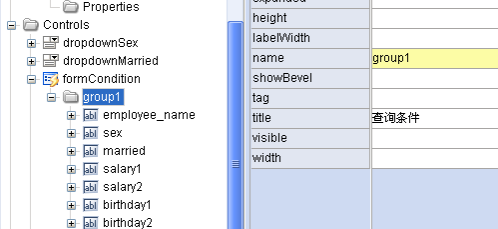
步骤3:选中AutoForm,在组件添加区域点击自动生成字段按钮。结果如图所示:
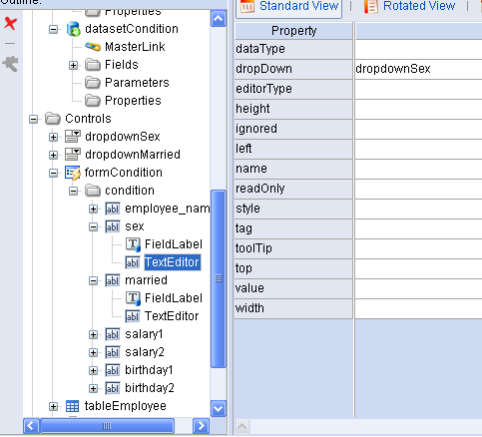
步骤4:设置formCondition中字段sex和married的TextEditor的DropDown属性分别为dropdownSex和dropdownMarried,如下图所示:
步骤5:添加一DataTable,属性设置如下:
属性 | 值 |
|---|---|
id | tableEmployee |
dataset | datasetEmployee |
width | 100% |
showHScrollBar | false |
height | 100% |
选中DataTable,点击生成字段生成按钮。
步骤6:添加一PagePolit,属性设置如下:
属性 | 值 |
|---|---|
id | pagepilotEmployee |
dataset | datasetEmployee |
添加Command和Button
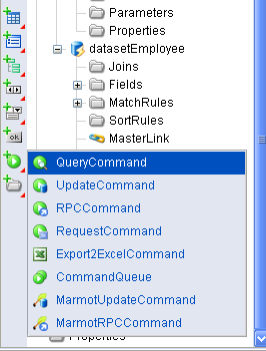
步骤1:添加一QueryCommand,添加QueryCommand的按钮位置如下图所示:
设置QueryCommand属性如下:
属性 | 值 |
|---|---|
id | commandQuery |
conditionDataset | datasetCondition |
queryDataset | datasetEmployee |
async | true |
queryMode | flush |
showLoadingTip | true |
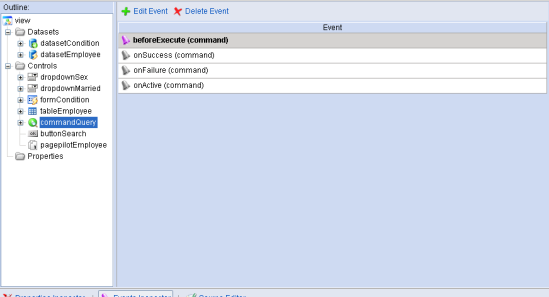
步骤2:切换到事件视图,选中commandQuery,双击commandQuery的beforeExecute()事件,位置如下图所示:
beforeExecute中的代码如下:
var employee_name = datasetCondition.getValue("employee_name");
if (employee_name) {
	 command.parameters().setValue("employee_name", "%" + employee_name + "%");
}
else {
	 command.parameters().setValue("employee_name", "");
}
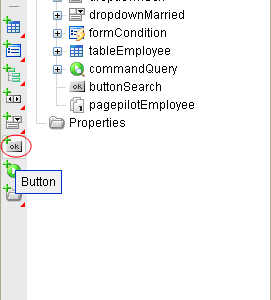
步骤3:添加一Button,Button的添加按钮位置如下:
Button的属性设置如下:
属性 | 值 |
|---|---|
id | buttonSearch |
command | commandQuery |
value | 查询 |
创建Jsp页面
具体步骤参见2.3.8节。下面是最终生成的JSP页面的代码:
<%@ page contentType="text/html; charset=UTF-8" %>
<%@ taglib uri="http://www.bstek.com/dorado" prefix="d" %>
 <html>
 <head>
 <title>查询</title>
 </head>
 <body>
 <d:View config="Query">
 <d:Layout type="border">
 <d:Pane position="top">
 <d:AutoForm id="formCondition">
 </d:AutoForm>
 <div width="200px" height="200px" style="overflow: auto" align="center">
 <d:Button id="buttonSearch"/>
 </div>
 </d:Pane>
 <d:Pane position="center">
 <d:DataTable id="tableEmployee" />
 </d:Pane>
 <d:Pane position="bottom">
 <div width="200px" height="200px" style="overflow: auto" align="center">
 <d:PagePilot id="pagepilotEmployee" />
 </div>
 </d:Pane>
 </d:Layout>
 </d:View>
 </body>
 </html>
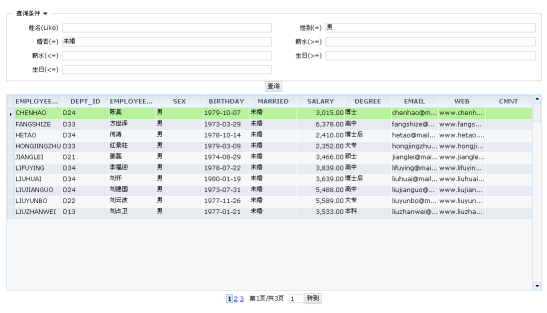
查看运行效果
启动服务器后,运行效果如下:
知识点
本章节用到了Command组件,关于Command组件可以参考《Dorado 5组件详解 v1.1》C部分。
MatchRule是相对来说比较难理解的一个部分,可以参考《Dorado 5用户指南 v1.1》的5.5章节。