概述
AutoForm在dorado中的作用类似html中的form表单,用来显示和编辑数据, 最终在页面上会由Dorado解析成一个普通的Table对象。本示例主要是用来展示AutoFrom中Element和Element Renderer的使用。本示例链接如下:
准备工作
新建一工程autoform,并且配置好数据库,具体步骤参考3.1.2节。
开发步骤
添加Dataset
步骤1:添加一Common ViewModel,文件名为AutoForm。添加一AutoSqlDataset,选择Employee表格,选择除了image以外的所有字段。AutoSqlDataset属性设置如下:
属性 | 值 |
|---|---|
id | datasetEmployee |
originTable | EMPLOYEE |
keyFields | employee_id |
async | true |
步骤2:添加一CustomDataset,id设置为datasetDegree,并且添加一Filed,name为degree,data type为string。
步骤3:为datasetDegree添加一DatasetListener,代码如下:
import com.bstek.dorado.data.*;
import com.bstek.dorado.common.*;
/**
 * AutoForm_datasetDegreeListener
 */
public class AutoForm_datasetDegreeListener extends AbstractDatasetListener {
    public void afterLoadData(Dataset dataset) throws Exception {
        dataset.insertRecord();
        dataset.setString("degree", "高中");
        dataset.insertRecord();
        dataset.setString("degree", "大专");
        dataset.insertRecord();
        dataset.setString("degree", "大学");
        dataset.insertRecord();
        dataset.setString("degree", "硕士");
        dataset.insertRecord();
        dataset.setString("degree", "博士");
        dataset.insertRecord();
        dataset.setString("degree", "其它");
    }
}
添加DropDown
步骤1:添加一ListDropDown,属性设置如下:
属性 | 值 |
|---|---|
id | dropdownSex |
mapValue | true |
autoDropDown | true |
步骤2:为dropdownSex添加2个字段,第一个字段name为"男",value为"true",第二个字段name为"女",value为"false"。
步骤3:设置datasetEmployee的字段sex的DropDown为dropdownSex。
步骤4:添加一DatasetDropdown,属性设置如下:
属性 | 值 |
|---|---|
id | dropdownDegree |
dataset | datasetDegree |
valueField | degree |
添加AutoForm、DataTable和DataPolit
步骤1:添加一DataTable,属性设置如下:
属性 | 值 |
|---|---|
id | tableGroupBox |
dataset | datasetEmployee |
width | 100% |
readOnly | true |
showHScrollBar | false |
选中tableGroupBox,点击生成字段按钮。
步骤2:添加一DataPolit,属性设置如下:
属性 | 值 |
|---|---|
id | datapilotGroupBox |
dataset | datasetEmployee |
步骤3:添加一AutoForm,属性设置如下:
属性 | 值 |
|---|---|
id | formGroupBox |
dataset | datasetEmployee |
选中formGroupBox,点击生成字段按钮。
为formGroupBox添加3个GroupBox,属性设置如下:
Name | Title |
|---|---|
group1 | 主要信息 |
group2 | 备注 |
group3 | 表格 |
移动生成的字段所在的GroupBox,只需拖动要移动的节点即可。 最后的结果如下:

为group1添加一Custom Element,属性设置如下:
属性 | 值 |
|---|---|
name | element1 |
showLabel | false |
controlId | datapilotGroupBox |
colSpan | 2 |
为group1添加一Custom Element Renderer,属性设置如下:
属性 | 值 |
|---|---|
name | element2 |
showLabel | false |
colSpan | 2 |
为group3添加一Custom Element,属性设置如下:
属性 | 值 |
|---|---|
name | element1 |
showLabel | false |
controlId | tableGroupBox |
步骤4:添加一DataTable,属性设置如下:
属性 | 值 |
|---|---|
id | tableSubWindow |
dataset | datasetEmployee |
width | 100% |
readOnly | true |
showHScrollBar | false |
步骤5:添加一DataPolit,属性设置如下:
属性 | 值 |
|---|---|
id | datapilotSubWindow |
dataset | datasetEmployee |
步骤6:添加一AutoForm,属性设置如下:
属性 | 值 |
|---|---|
id | formSubWindow |
dataset | datasetEmployee |
选中formSubWindow,点击生成字段按钮。
为formSubWindow添加3个GroupBox,属性设置如下:
Name | Title |
|---|---|
group1 | 主要信息 |
group2 | 备注 |
group3 | 表格 |
移动生成的字段所在的GroupBox,只需拖动要移动的节点即可。 最后的结果如下:
为group1添加一Custom Element,属性设置如下:
属性 | 值 |
|---|---|
name | element1 |
showLabel | false |
controlId | datapilotSubWindow |
colSpan | 2 |
为group1添加一Custom Element Renderer,属性设置如下:
属性 | 值 |
|---|---|
name | element2 |
showLabel | false |
colSpan | 2 |
为group3添加一Custom Element,属性设置如下:
属性 | 值 |
|---|---|
name | element1 |
showLabel | false |
controlId | tableSubWindow |
创建Jsp页面
生成Jsp页面以后再编辑一下布局,最后结果如下:
<%@ page contentType="text/html; charset=UTF-8" %>
<%@ taglib uri="http://www.bstek.com/dorado" prefix="d" %>
 <html>
 <head>
 <title>自动表单</title>
 </head>
 <body>
 <d:View config="AutoForm">
 <d:TabSet id="tabset" currentTab="tab1" width="100%" height="100%">
 <d:Tab name="tab1" label="GroupBox形式">
 <d:AutoForm id="formGroupBox">
 <d:FormElementRenderer group="group1" element="element2">
 <d:Layout type="Hflow">
 <d:Pane>
 自定义的Elment Renderer
 </d:Pane>
 <d:Pane>
 <d:Button id="button1" />
 </d:Pane>
 <d:Pane>
 <d:Button id="button2" />
 </d:Pane>
 <d:Pane>
 <d:Button id="button3" />
 </d:Pane>
 </d:Layout>
 </d:FormElementRenderer>
 </d:AutoForm>
 </d:Tab>
 <d:Tab name="tab2" label="SubWindow形式">
 <d:AutoForm id="formSubWindow" />
 </d:Tab>
 </d:TabSet>
 </d:View>
 </body>
 </html>
查看运行效果
启动服务器后,浏览效果如下:
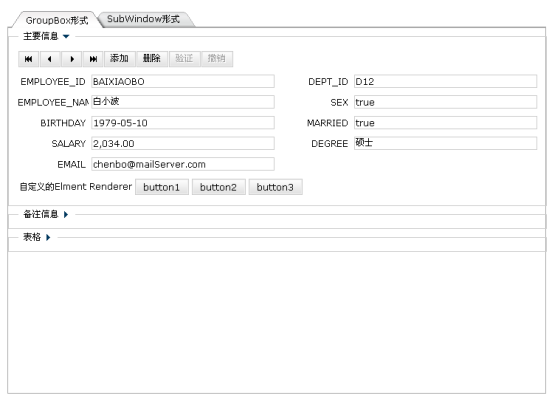
选择不同的Tab页,可以看到AutoForm的两种不同形式。
知识点
本示例的知识点主要是AutoForm的使用,关于AutoForm可以参考《dorado 5组件详解 1.1》的第二部分C部分的第3节。