概述
VO即为Value Object,在其他地方可能会成为DTO(Data Transfer Object)或者DO(Data Object)。上一节展示了如何从Resultset中导入数据,Dorado不仅仅支持从Resultset中导入数据,还可以支持其他多种VO,比如List等。本例利用了Hibernate作为数据提取和持久化的后端实现。但本例旨在演示如何通过VO 利用dorado的Dataset与后台业务逻辑进行交互,而不在于演示如何使用Hibernate。相反此处直接在ViewModel的实现类和Dataset的监听器中调用Hibernate的使用方法并 不是一种很好的实践。本例链接如下:
准备工作
步骤1:新建一工程vo1,并且配置好数据库,具体步骤参考3.1.2节。
步骤2:拷贝hibernate3.jar、ehcache-1.1.jar、jta-1-0-1a.jar、cglib-2.1.jar、asm.jar、antlr-2.7.5H3.jar、asm-attrs.jar到工程的WEB-INF/lib目录下面。
提示:这些jar文件可以去http://www.hibernate.org/下载。 |
开发步骤
添加POJO和Hibernate映射文件
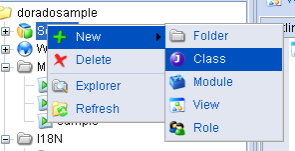
步骤1:在Source上点击右键,弹出的菜单中选中New->Class,如图所示:
弹出的菜单中选择SimpleClass,如图所示:

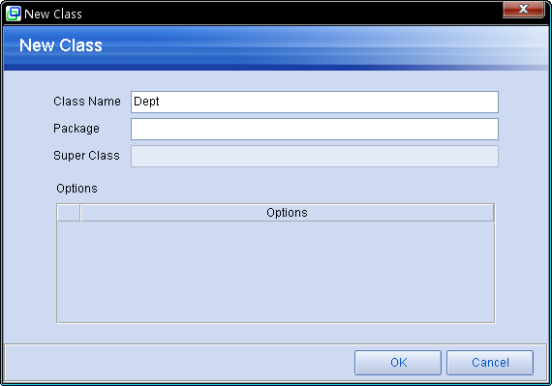
弹出输入Name和Package的菜单,在Class处输入Dept,如图所示:
步骤2:编辑Dept类的代码如下:
import java.util.List;
import java.util.Vector;
/**
 * Dept
 */
public class Dept {
    private String id;
    private String name;
    private List employees = new Vector();
    public String getId() {
        return id;
    }
    public void setId(String id) {
        this.id = id;
    }
    public String getName() {
        return name;
    }
    public void setName(String name) {
        this.name = name;
    }
    public List getEmployees() {
        return employees;
    }
    public void setEmployees(List employees) {
        this.employees = employees;
    }
}
步骤3:在Source上点击右键,在弹出的菜单中选择Explorer,如图所示:

在弹出的资源浏览器中新建一文本文件,改名为Dept.hbm.xml,并且更改其内容如下:
<?xml version="1.0" encoding="UTF-8"?>
<!DOCTYPE hibernate-mapping PUBLIC
 "-//Hibernate/Hibernate Mapping DTD 3.0//EN"
 "http://hibernate.sourceforge.net/hibernate-mapping-3.0.dtd">
 <hibernate-mapping default-lazy="false">
 <class name="Dept">
 <id name="id" column="DEPT_ID"/>
 <property name="name" column="DEPT_NAME" insert="true" update="true"/>
 <bag name="employees" cascade="all">
 <key column="DEPT_ID"/>
 <one-to-many class="Employee"/>
 </bag>
 </class>
 </hibernate-mapping>
步骤4:添加一Class,名为Branch,代码如下:
import java.util.List;
import java.util.Vector;
public class Branch {
    private String id;
    private String name;
    private List depts = new Vector();
    public String getId() {
        return id;
    }
    public void setId(String id) {
        this.id = id;
    }
    public String getName() {
        return name;
    }
    public void setName(String name) {
        this.name = name;
    }
    public List getDepts() {
        return depts;
    }
    public void setDepts(List depts) {
        this.depts = depts;
    }
}
步骤5:同步骤3,新建立一文本文件,改名为Branch.hbm.xml,文件内容如下:
<?xml version="1.0" encoding="UTF-8"?>
<!DOCTYPE hibernate-mapping PUBLIC
 "-//Hibernate/Hibernate Mapping DTD 3.0//EN"
 "http://hibernate.sourceforge.net/hibernate-mapping-3.0.dtd">
 <hibernate-mapping default-lazy="false">
 <class name="Branch">
 <id name="id" column="BRANCH_ID"/>
 <property name="name" column="BRANCH_NAME" insert="true" update="true"/>
 <bag name="depts" cascade="all">
 <key column="BRANCH_ID"/>
 <one-to-many class="Dept"/>
 </bag>
 </class>
 </hibernate-mapping>
步骤6:新建一Class,名为Employee,其代码如下:
import java.util.Date;
public class Employee {
    private String id;
    private String name;
    private boolean sex;
    private boolean married;
    private Date birthday;
    private float salary;
    private String degree;
    private String web;
    private String email;
    private String comment;
    public String getId() {
        return id;
    }
    public String getName() {
        return name;
    }
    public boolean isSex() {
        return sex;
    }
    public boolean isMarried() {
        return married;
    }
    public Date getBirthday() {
        return birthday;
    }
    public float getSalary() {
        return salary;
    }
    public String getDegree() {
        return degree;
    }
    public String getWeb() {
        return web;
    }
    public String getEmail() {
        return email;
    }
    public String getComment() {
        return comment;
    }
    public void setId(String id) {
        this.id = id;
    }
    public void setName(String name) {
        this.name = name;
    }
    public void setSex(boolean sex) {
        this.sex = sex;
    }
    public void setMarried(boolean married) {
        this.married = married;
    }
    public void setBirthday(Date birthday) {
        this.birthday = birthday;
    }
    public void setSalary(float salary) {
        this.salary = salary;
    }
    public void setDegree(String degree) {
        this.degree = degree;
    }
    public void setWeb(String web) {
        this.web = web;
    }
    public void setEmail(String email) {
        this.email = email;
    }
    public void setComment(String comment) {
        this.comment = comment;
    }
}
步骤7:同步骤3,新建一文本文件,改名为Employee.hbm.xml,其内容如下:
<?xml version="1.0" encoding="UTF-8"?>
<!DOCTYPE hibernate-mapping PUBLIC
 "-//Hibernate/Hibernate Mapping DTD 3.0//EN"
 "http://hibernate.sourceforge.net/hibernate-mapping-3.0.dtd">
 <hibernate-mapping default-lazy="false">
 <class name="Employee">
 <id name="id" column="EMPLOYEE_ID"/>
 <property name="name" column="EMPLOYEE_NAME"/>
 <property name="birthday" column="BIRTHDAY"/>
 <property name="salary" column="SALARY"/>
 <property name="sex" column="SEX"/>
 <property name="married" column="MARRIED"/>
 <property name="degree" column="DEGREE"/>
 <property name="email" column="EMAIL"/>
 <property name="web" column="WEB"/>
 <property name="comment" column="CMNT"/>
 </class>
 </hibernate-mapping>
步骤8:同步骤3,新建一文本文件,改名为hibernate.cfg.xml,其内容如下:
<?xml version="1.0" encoding="UTF-8"?>
<!DOCTYPE hibernate-configuration PUBLIC
 "-//Hibernate/Hibernate Configuration DTD 3.0//EN"
 "http://hibernate.sourceforge.net/hibernate-configuration-3.0.dtd">
 <hibernate-configuration>
 <session-factory>
 <property name="show_sql">true</property>
 <mapping resource="Branch.hbm.xml" />
 <mapping resource="Dept.hbm.xml" />
 <mapping resource="Employee.hbm.xml" />
 </session-factory>
 </hibernate-configuration>
步骤9:添加一Class,名为HibernateUtils,代码如下:
import java.sql.Connection;
import org.hibernate.Session;
import org.hibernate.SessionFactory;
import org.hibernate.cfg.Configuration;
import com.bstek.dorado.common.ds.ConnectionHelper;
public class HibernateUtils {
    private static final String CONFIGURE = "hibernate.cfg.xml";
    private static final SessionFactory sessionFactory;
    static {
        try {
            // Create the SessionFactory
            Configuration configuration = new Configuration()
                    .configure(CONFIGURE);
            configuration.setProperty("hibernate.dialect",
                    "org.hibernate.dialect.HSQLDialect");
            sessionFactory = configuration.buildSessionFactory();
        } catch (Throwable ex) {
            // Make sure you log the exception, as it might be swallowed
            System.out.println("Initial SessionFactory creation failed.");
            throw new ExceptionInInitializerError(ex);
        }
    }
    public static final ThreadLocal session = new ThreadLocal();
    public static Session openSession() throws Exception {
        Session s = (Session) session.get();
        // Open a new Session, if this Thread has none yet
        if (s == null) {
            Connection connection = ConnectionHelper.getDefaultConnection();
            s = sessionFactory.openSession(connection);
            session.set(s);
        }
        return s;
    }
    public static void closeSession() throws Exception {
        Session s = (Session) session.get();
        if (s != null) {
            Connection connection = s.close();
            connection.close();
        }
        session.set(null);
    }
}
添加Dataset和DatasetListener
步骤1:新建一Common ViewModel,文件名为VO1。
步骤2:新建一CustomeDataset,位置如下图所示:

设置CustomeDataset的属性如下:
属性 | 值 |
|---|---|
id | datasetEmployee |
objectClazz | Employee |
pageSize | 10 |
选中CustomeDataset,点击生成字段按钮。
步骤3:添加一Dataset Listener,代码如下;
import java.util.List;
import org.hibernate.Session;
import com.bstek.dorado.data.AbstractDatasetListener;
import com.bstek.dorado.data.Dataset;
import com.bstek.dorado.data.PagingHelper;
/**
 * VO1_dataset1Listener
 */
public class VO1_datasetEmployeeListener extends AbstractDatasetListener {
    public void afterLoadData(Dataset dataset) throws Exception {
        Session session = HibernateUtils.openSession();
        try {
            int pageSize = dataset.getPageSize();
            int rowCount = ((Integer) session
                    .createQuery("select count(star) from Employee").iterate()
                    .next()).intValue();
            // 利用PagingHelper辅助对List的分页
            PagingHelper paging = new PagingHelper(pageSize,
                    dataset.getPageIndex(), rowCount);
            List employees = session.createQuery("from Employee")
                    .setFirstResult(paging.getFromIndex())
                    .setMaxResults(pageSize).list();
            dataset.fromDO(employees); // 将employees中的数据反射到Dataset中
            dataset.setPageCount(paging.getPageCount()); // 设置Dataset的总页数
        } finally {
            HibernateUtils.closeSession();
        }
    }
}
添加DataTable和PagePolit
步骤1:添加一DataTable,属性设置如下:
属性 | 值 |
|---|---|
id | tableEmployee |
dataset | datasetEmployee |
width | 100% |
height | 100% |
步骤2:添加一PagePolit,属性设置如下:
属性 | 值 |
|---|---|
id | pagepilotEmployee |
dataset | datasetEmployee |
添加ViewModel实现
为当前ViewModel添加一ViewModel实现,该ViewModel实现代码如下:
import java.util.List;
import org.hibernate.Session;
import org.hibernate.Transaction;
import com.bstek.dorado.common.DoradoContext;
import com.bstek.dorado.common.MessageHelper;
import com.bstek.dorado.data.Dataset;
import com.bstek.dorado.data.ParameterSet;
import com.bstek.dorado.view.DefaultViewModel;
/**
 * VO1ViewModel
 */
public class VO1ViewModel extends DefaultViewModel {
    public void updateEmployees(ParameterSet parameters,
            ParameterSet outParameters) throws Exception {
        Session session = HibernateUtils.openSession();
        try {
            Transaction tx = session.beginTransaction();
            List employees;
            int size;
            Dataset dataset = getDataset("datasetEmployee");
            // 处理所有被删除的记录
            // 将Dataset中所有被删除的记录转换到List中
            employees = dataset.toDO(Dataset.FILTER_DELETED);
            size = employees.size();
            for (int i = 0; i < size; i++) {
                Employee employee = (Employee) employees.get(info);
                session.delete(employee);
            }
            // 处理所有被修改的记录
            // 将Dataset中所有被修改的记录转换到List中
            employees = dataset.toDO(Dataset.FILTER_MODIFIED);
            size = employees.size();
            for (int i = 0; i < size; i++) {
                Employee employee = (Employee) employees.get(info);
                session.update(employee);
            }
            // 处理所有新增的记录
            // 将Dataset中所有新增的记录转换到List中
            employees = dataset.toDO(Dataset.FILTER_NEW);
            size = employees.size();
            for (int i = 0; i < size; i++) {
                Employee employee = (Employee) employees.get(info);
                session.save(employee);
            }
            tx.commit();
        } finally {
            HibernateUtils.closeSession();
        }
        super.doUpdateData(parameters, outParameters);
    }
    public void raiseSalary(ParameterSet parameters, ParameterSet outParameters)
            throws Exception {
        Session session = HibernateUtils.openSession();
        try {
            Transaction tx = session.beginTransaction();
            Dataset dataset = getDataset("datasetEmployee");
            // 将Dataset中的当前记录转换为Bean
            Employee employee = (Employee) dataset.toSingleDO();
            float salary = employee.getSalary() + 500;
            // 设置到此属性中的数据将在提交成功后自动被传回Client端
            employee.setSalary(salary);
            session.update(employee);
            MessageHelper.addMessage(DoradoContext.getContext(),
                    "[" + employee.getName() + "]已加薪至" + salary + "!");
            tx.commit();
        } finally {
            HibernateUtils.closeSession();
        }
        super.doUpdateData(parameters, outParameters);
    }
}
添加Command和Button
步骤1:添加一UpdateCommand,属性设置如下:
属性 | 值 |
|---|---|
id | commandUpdateEmployees |
method | updateEmployees |
为commandUpdateEmployees添加一DatasetInfo,为datasetEmployee。
步骤2:添加一Button,属性设置如下:
属性 | 值 |
|---|---|
id | buttonUpdateEmployees |
command | commandUpdateEmployees |
value | 保存 |
width | 75 |
步骤3:添加一UpdateCommand,属性设置如下:
属性 | 值 |
|---|---|
id | commandRaiseSalary |
method | raiseSalary |
为commandRaiseSalary添加一DatasetInfo,为datasetEmployee。设置datasetEmployee的submitScope为current。
步骤4:添加一Button,属性设置如下:
属性 | 值 |
|---|---|
id | buttonRaiseSalary |
command | commandRaiseSalary |
value | 为当前员工加薪 |
创建Jsp页面
生成Jsp页面后,再对Jsp页面进行编辑,最后结果如下:
<%@ page contentType="text/html; charset=UTF-8" %>
<%@ taglib uri="http://www.bstek.com/dorado" prefix="d" %>
 <html>
 <head>
 </head>
 <body style="overflow: hidden">
 <d:View config="VO1">
 <d:Layout type="vflow" height="100%">
 <d:Pane>
 <d:Layout type="Hflow">
 <d:Pane>
 <d:Button id="buttonUpdateEmployees" />
 </d:Pane>
 <d:Pane>
 <d:Button id="buttonRaiseSalary" />
 </d:Pane>
 </d:Layout>
 </d:Pane>
 <d:Pane height="100%">
 <d:DataTable id="tableEmployee" />
 </d:Pane>
 <d:Pane>
 <d:PagePilot id="pagepilotEmployee" />
 </d:Pane>
 </d:Layout>
 </d:View>
 </body>
 </html>
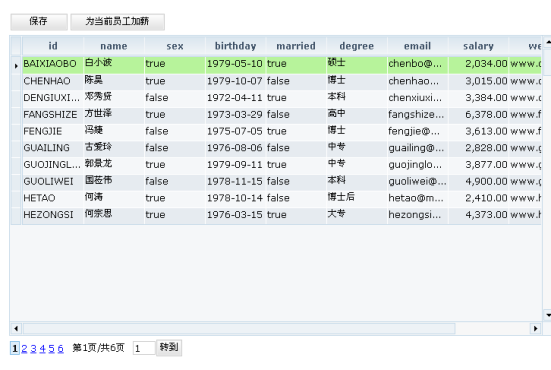
查看运行效果
浏览页面,效果如下:
知识点
本例的知识点主要是CustomDataset还有hibernate的知识。关于hibernate,建议参考相应文档。关于CustomDataset,建议参考《Dorado 5 用户指南 v1.1》第5.6节。