概述
Dorado的BRich Client拥有完整的对象模型, 提供了丰富的属性和方法结构, 以便于开发人员更加方便的使用和扩展dorado的功能. 您也可以按下Ctrl+Shift+Alt+F12或Ctrl+Shift+Alt+F11调出dorado的客户端调试器。
本章节用来展示Dorado具有的BRich Client完整的对象模型和强大事件机制,目前在示例中心->分类示例->数据处理目录下面。示例链接如下:
准备工作
新建一工程client,并且配置好数据库,具体步骤参考3.1.2节。
开发步骤
添加Dataset
步骤1:新建一Common ViewModel,文件名为client。
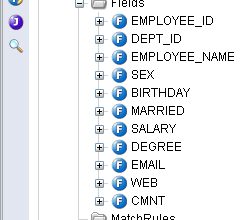
步骤2:新建一AutoSqlDataset,选取表为Employee表,选择字段如下:

设置AutoSqlDataset属性如下:
属性 | 值 |
|---|---|
id | datasetEmployee |
originTable | EMPLOYEE |
添加TextEditor和ListDropDown
步骤1:添加一ListDropDown,设置其属性如下:
属性 | 值 |
|---|---|
id | dropdownScript |
autoDropDown | true |
为ListDropDown添加DropDownItem,DropDownItem的label都为空,DropDownItem的Value依次为:
 datasetEmployee.moveFirst();
 datasetEmployee.moveNext();
 datasetEmployee.insertRecord();
 alert(datasetEmployee.getString("employee_name"));
 datasetEmployee.setValue("employee_name";, "<<已被修改>>");
 datasetEmployee.deleteRecord();
 alert(DoradoFactory);
 alert(datasetEmployee);
 alert(datasetEmployee.getCurrent());
步骤2:添加一TextEditor,设置属性如下:
属性 | 值 |
|---|---|
id | editorScript |
editorType | textarea |
width | 100% |
height | 70 |
dropDown | dropdownScript |
步骤3:添加一TextEditor,设置属性如下:
属性 | 值 |
|---|---|
id | editorLog |
editorType | textarea |
width | 100% |
height | 50% |
readOnly | true |
添加Button
步骤1:添加一Button,设置属性如下:
属性 | 值 |
|---|---|
id | buttonEvaluation |
value | 执行 |
步骤2:为buttonEvaluation的OnClick事件添加如下代码:
eval(editorScript.value);
步骤3:添加一Button,属性设置如下:
属性 | 值 |
|---|---|
id | buttonClear |
value | 清除日志 |
步骤4:为buttonClear的Onclick事件添加如下代码:
editorLog.value = "";
添加DataTable和Datapolit
步骤1:添加一DataTable,设置其属性如下:
属性 | 值 |
|---|---|
id | tableEmployee |
dataset | datasetEmployee |
height | 100% |
width | 100% |
showHScrollBar | false |
步骤2:选中tableEmployee,单击自动生成字段的按钮,保留所有字段。
步骤3:点击组件选择区域上的根节点View,切换到事件编写视图,为该视图添加一函数,双击最上方的"<<function>>",代码如下:
function log(message) {
  var tab = tabset1.getCurrentTab();
  if (tab == null || tab.getName() != "event") return;

  var editor = editorLog;
  if (editor != null) {
    if (editor.value == "") {
      editor.value = message;
    }
    else {
      editor.value = editor.value + "\n" + message;
    }
  }
}
步骤4:为 datasetEmployee的beforeScroll事件添加如下代码:
log("before scroll");
为 datasetEmployee的afterScroll事件添加如下代码:
log("after scroll");
其他的事件自己依据情况来添加。
步骤5:添加一Datapolit,属性设置如下:
属性 | 值 |
|---|---|
id | datapilotEmployee |
dataset | datasetEmployee |
创建Jsp页面
生成Jsp页面以后再编辑一下布局,最后结果如下:
<%@ page contentType="text/html; charset=UTF-8" %>
<%@ taglib uri="http://www.bstek.com/dorado" prefix="d" %>
 <html>
 <head>
 <title></title>
 </head>
 <body>
 <d:View config="Client">
 <d:Layout type="border">
 <d:Pane position="top">
 <d:TabSet id="tabset1" currentTab="tab1" height="120">
 <d:Tab name="tab1" label="对象模型">
 <d:TextEditor id="editorScript" />
 <d:Button id="buttonEvaluation" />
 </d:Tab>
 <d:Tab name="tab2" label="客户端事件">
 <d:TextEditor id="editorLog" />
 <d:Button id="buttonClear" />
 </d:Tab>
 </d:TabSet>
 </d:Pane>
 <d:Pane position="center">
 <d:DataTable id="tableEmployee" />
 </d:Pane>
 <d:Pane position="bottom">
 <d:DataPilot id="datapilotEmployee" />
 </d:Pane>
 </d:Layout>
 </d:View>
 </body>
 </html>
查看运行效果
启动服务器后,浏览效果如下:

可以选择对象模型Tab下的TextEditor中的JavaScript语句来进行执行,查看一下效果。当切换到客户端事情Tab的时候,拖动DataTable的滚动条,可以看到DatasetEmployee中的事件的触发。
知识点
本章节重点在于Dorado的对象模型以及事件机制。关于对象模型和事件机制的细节可以参考Server api和Client api。