概述
dorado5中包含了对AJAX的实现。开发人员可以利用RPCCommand、QueryCommand、UpdateCommand、Dataset等控件轻松的实现具有AJAX特征的网络应用。本示例链接如下:
准备工作
新建一工程ajax,并且配置好数据库,具体步骤参考3.1.2节。
开发步骤
添加ViewModel实现
步骤1:添加一Common ViewModel,文件名为Ajax。
步骤2:添加Ajax的ViewModel实现,代码如下:
import com.bstek.dorado.data.ParameterSet;
import com.bstek.dorado.view.DefaultViewModel;
/**
 * AJAXViewModel
 */
public class AJAXViewModel extends DefaultViewModel {
    public void multiply(ParameterSet parameters, ParameterSet outParameters)
            throws Exception {
        float num1 = parameters.getFloat("num1");
        float num2 = parameters.getFloat("num2");
        float num3 = num1 * num2;
        outParameters.setFloat("num3", num3);
    }
    public void divide(ParameterSet parameters, ParameterSet outParameters)
            throws Exception {
        float num1 = parameters.getFloat("num1");
        float num2 = parameters.getFloat("num2");
        if (num2 == 0) {
            throw new IllegalArgumentException("除数不能为零!");
        }
        float num3 = num1 / num2;
        outParameters.setFloat("num3", num3);
    }
    public void getSystemInfo(ParameterSet parameters,
            ParameterSet outParameters) throws Exception {
        Runtime runtime = Runtime.getRuntime();
        outParameters.setLong("freeMemory", runtime.freeMemory());
        outParameters.setLong("totalMemory", runtime.totalMemory());
    }
    public void heavyOperation(ParameterSet parameters,
            ParameterSet outParameters) throws Exception {
        Thread.sleep(3000);
    }
}
添加数学运算操作1功能
步骤1:添加一TextEditor,属性设置如下:
属性 | 值 |
|---|---|
id | editorNum1 |
width | 70 |
value | 7 |
dataType | float |
步骤2:添加一TextEditor,属性设置如下:
属性 | 值 |
|---|---|
id | editorNum2 |
width | 70 |
value | 8 |
dataType | float |
步骤3:添加一TextEditor,属性设置如下:
属性 | 值 |
|---|---|
id | editorNum3 |
width | 150 |
readOnly | true |
步骤4:添加一RPCCommand,属性设置如下:
属性 | 值 |
|---|---|
id | commandMultiply |
async | true |
method | multiply |
为commandMultiply的beforeExecute事件添加如下代码:
command.parameters().setValue("num1", editorNum1.value);
command.parameters().setValue("num2", editorNum2.value);
为commandMultiply的onSuccess事件添加如下代码:
editorNum3.value = command.outParameters().getValue("num3");
步骤5:添加一Button,属性设置如下:
属性 | 值 |
|---|---|
id | buttonMultiply |
value | = |
command | commandMultiply |
width | 30 |
添加数学运算操作2功能
步骤1:添加一TextEditor,属性设置如下:
属性 | 值 |
|---|---|
id | editorNum4 |
width | 70 |
value | 100 |
dataType | float |
步骤2:添加一TextEditor,属性设置如下:
属性 | 值 |
|---|---|
id | editorNum5 |
width | 70 |
value | 0 |
dataType | float |
步骤3:添加一TextEditor,属性设置如下:
属性 | 值 |
|---|---|
id | editorNum6 |
width | 150 |
readOnly | true |
步骤4:添加一RPCCommand,属性设置如下:
属性 | 值 |
|---|---|
id | commandDivide |
method | divide |
async | true |
为commandDivide的beforeExecute事件添加如下代码:
command.parameters().setValue("num1", editorNum4.value);
command.parameters().setValue("num2", editorNum5.value);
为commandDivide的beforeExecute事件添加如下代码:
editorNum6.value = command.outParameters().getValue("num3");
步骤5:添加一Button,属性设置如下:
属性 | 值 |
|---|---|
id | buttonDivide |
value | = |
command | commandDivide |
width | 30 |
添加比较耗时的Server端的操作功能
步骤1:添加一RPCCommand,属性设置如下:
属性 | 值 |
|---|---|
id | commandHeavyOperation |
method | heavyOperation |
async | true |
为commandHeavyOperation的beforeExecute事件添加如下代码:
buttonHeavyOperation.disabled = true;
为commandHeavyOperation的onSuccess事件添加如下代码:
buttonHeavyOperation.disabled = false;
步骤4:添加一Button,属性设置如下:
属性 | 值 |
|---|---|
id | buttonHeavyOperation |
command | commandHeavyOperation |
value | 测试 |
width | 75 |
添加自动获取Server端的信息功能
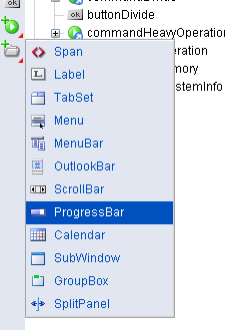
步骤1:添加一ProgressBar,添加位置如下图所示:

ProgressBar属性设置如下:
属性 | 值 |
|---|---|
id | progressbarMemory |
width | 250 |
textPattern | 空闲率 \${position}% |
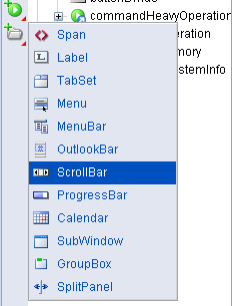
步骤2:添加一ScrollBar,添加位置如下:

ScrollBar属性设置如下:
属性 | 值 |
|---|---|
id | scrollbarInterval |
width | 250 |
orientation | horizontal |
min | 1 |
max | 10 |
smallChange | 1 |
bigChange | 1 |
position | 2 |
pageSize | 1 |
为scrollbarInterval 的onPositionChanged事件添加如下代码:
labelInterval.innerText = scrollBar.getPosition();
步骤3:添加一RPCCommand,属性设置如下:
属性 | 值 |
|---|---|
id | commandGetSystemInfo |
showLoadingTip | false |
method | getSystemInfo |
为commandGetSystemInfo的onSuccess事件添加如下代码:
var freeMemory = command.outParameters().getValue("freeMemory");
var totalMemory = command.outParameters().getValue("totalMemory");
labelFreeMemory.innerText = formatFloat(freeMemory / 1000, "#,##.###");
labelTotalMemory.innerText = formatFloat(totalMemory / 1000, "#,##.###");
var position = formatFloat((freeMemory / totalMemory) * 100, "##");
progressbarMemory.setPosition(position);
setTimeout("labelGetSystemInfoRetrieving.style.backgroundColor = \"\";", 200);

setTimeout("commandGetSystemInfo.execute()", scrollbarInterval.getPosition() * 1000);
为commandGetSystemInfo的beforeExecute事件添加如下代码:
labelGetSystemInfoRetrieving.style.backgroundColor = "red";
步骤4:在view的onLoad事件添加如下代码:
setTimeout("commandGetSystemInfo.execute();", 1000);
添加利用Dataset提取数据功能
步骤1:添加一AutoSqlDataset,选择Employee表格,选择所有列,属性设置如下:
属性 | 值 |
|---|---|
id | datasetEmployee |
originTable | EMPLOYEE |
autoLoadData | false |
async | true |
keyFields | employee_id |
步骤2:添加一TextEditor,属性设置如下:
属性 | 值 |
|---|---|
id | editorEmployeeId |
value | CHENGYU |
步骤3:添加一QueryCommand,属性设置如下:
属性 | 值 |
|---|---|
id | commandRetrieveData |
queryDataset | datasetEmployee |
showLoadingTip | true |
async | true |
为commandRetrieveData的beforeExecute事件添加如下代码:
command.parameters().setValue("employee_id", editorEmployeeId.value);
buttonRetrieveData1.disabled = true;
为commandRetrieveData的onSuccess事件添加如下代码:
var record = datasetEmployee.getCurrent();
if (record != null) {
	alert(record);
}
else {
	alert("没有匹配的记录!");
}
buttonRetrieveData1.disabled = false;
步骤4:添加一Button,属性设置如下:
属性 | 值 |
|---|---|
id | buttonRetrieveData1 |
command | commandRetrieveData |
value | 利用查询命令提取 |
步骤5:添加一Button,属性设置如下:
属性 | 值 |
|---|---|
id | buttonRetrieveData2 |
value | 利用回调函数提取 |
为buttonRetrieveData2的onClick事件添加如下代码:
buttonRetrieveData2.disabled = true;
showLoadingTip();
datasetEmployee.parameters().setValue("employee_id", editorEmployeeId.value);
datasetEmployee.flushData(function(successful) {
    if (successful) {
      var record = datasetEmployee.getCurrent();
      if (record != null) {
        alert(record);
      }
      else {
        alert("没有匹配的记录!");
      }
    }

    buttonRetrieveData2.disabled = false;
    hideLoadingTip();
  }
);
创建Jsp页面
生成Jsp页面以后再编辑一下布局,最后结果如下:
<%@ page contentType="text/html; charset=UTF-8" %>
<%@ taglib uri="http://www.bstek.com/dorado" prefix="d" %>
 <html>
 <head>
 </head>
 <body>
 <d:View config="AJAX">
 <table width="100%">
 <tr style="background-color: #F5F7F9">
 <td>在Server端完成数学运算1:</td>
 <td>
 <d:Layout type="Hflow">
 <d:Pane>
 <d:TextEditor id="editorNum1" />
 </d:Pane>
 <d:Pane align="center" width="16">
 X
 </d:Pane>
 <d:Pane>
 <d:TextEditor id="editorNum2" />
 </d:Pane>
 <d:Pane>
 <d:Button id="buttonMultiply" />
 </d:Pane>
 <d:Pane>
 <d:TextEditor id="editorNum3" />
 </d:Pane>
 </d:Layout>
 </td>
 </tr>
 <tr>
 <td>在Server端完成数学运算2:</td>
 <td>
 <d:Layout type="Hflow">
 <d:Pane>
 <d:TextEditor id="editorNum4" />
 </d:Pane>
 <d:Pane align="center" width="16">
 /
 </d:Pane>
 <d:Pane>
 <d:TextEditor id="editorNum5" />
 </d:Pane>
 <d:Pane>
 <d:Button id="buttonDivide" />
 </d:Pane>
 <d:Pane>
 <d:TextEditor id="editorNum6" />
 </d:Pane>
 </d:Layout>
 </td>
 </tr>
 <tr style="background-color: #F5F7F9">
 <td>比较耗时的Server端的操作:</td>
 <td>
 <d:Button id="buttonHeavyOperation" />
 </td>
 </tr>
 <tr>
 <td>自动获取Server端的信息:</td>
 <td>
 JVM空闲内存: <LABEL id="labelFreeMemory"> === </LABEL>(KB),
 JVM总内存: <LABEL id="labelTotalMemory"> === </LABEL>(KB)
 <d:Layout type="Hflow">
 <d:Pane>
 <d:ProgressBar id="progressbarMemory"/>
 </d:Pane>
 <d:Pane>

 <DIV id="labelGetSystemInfoRetrieving" style="width: 8; height: 8;
overflow: hidden; border-width: 1; border-color: Maroon; border-style:
solid"></DIV>
 </d:Pane>
 <d:Pane style="font-size: 8pt">
 retrieving
 </d:Pane>
 </d:Layout>
 <d:Layout type="Hflow">
 <d:Pane width="100">
 采样间隔(<LABEL id="labelInterval">2</LABEL>秒):
 </d:Pane>
 <d:Pane>
 <d:ScrollBar id="scrollbarInterval" />
 </d:Pane>
 </d:Layout>
 </td>
 </tr>
 <tr style="background-color: #F5F7F9">
 <td>利用Dataset提取数据:</td>
 <td>
 请输入一个员工的ID: (etc: ANLIN, PANLONG, CHENGYU, ZHENGQI, XULIJUN, NAXIN, JINYI)
 <br>
 <d:TextEditor id="editorEmployeeId" />
 <d:Button id="buttonRetrieveData1" />
 <d:Button id="buttonRetrieveData2" />
 </td>
 </tr>
 </table>
 </d:View>
 </body>
 </html>
查看运行效果
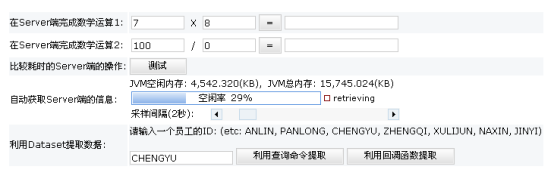
启动服务器后,浏览效果如下:

从上图可以看到在Dorado中不同的Ajax实现方式。
知识点
本示例的知识点主要是RPCCommand。关于RPCCommand,可以查看《dorado 5 组件详解 1.1》第一部分C部分的第4节。