步骤1:在com.bstek.dorado.sample.standardlesson.junior.main目录下双击打开Main.view.xml
步骤2:修改Label控件配置
在前一节中我们已经添加了Label控件,现在直接修改Label控件属性,鼠标选中Label控件,修改属性如下:
| 属性 | 值 | 说明 |
|---|---|---|
| text | Dorado7实战必修课“企业通讯录”初级教程 | 标签控件显示的文本 |
| height | 40 | 标签控件的高度 |
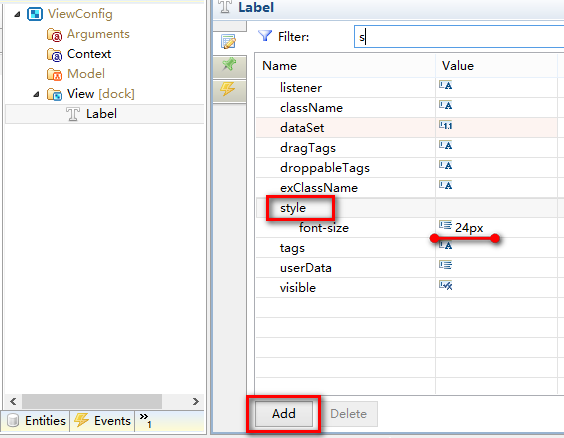
鼠标选中Label控件的style属性,点击【Add】按钮,给标签控件增加一个css样式属性,【style】属性设置如下:
属性 | 值 | 说明 |
|---|---|---|
| font-size | 24px | 字体大小 |
最终显示如下图:
接下来我们需要设置标签的内边距,让其周围空出距离,显得更美观些,鼠标选中label控件,在右侧工作区中切换到第三个标签页即layoutConstraint工作区,设置padding属性为5,如下图所示:

步骤3:添加并配置ToolBar
在【ViewConfig】节点下的【View】节点下添加一个ToolBar,并在工具栏控件内部添加3个MenuButton子控件作为一级菜单,分别设置MenuButton的caption属性如下:
| 控件 | caption |
|---|---|
| MenuButton1 | 系统 |
| MenuButton2 | 通讯录 |
| MenuButton3 | 基础数据维护 |
显示如下图所示:

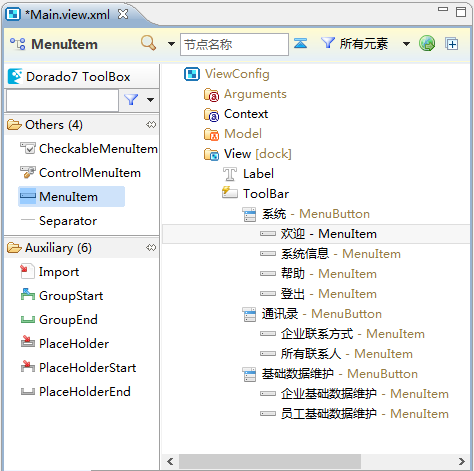
在【系统】这个MenuButton控件下添加4个MenuItem控件,分别设置其属性如下:
| 控件 | caption |
|---|---|
| MenuItem1 | 欢迎 |
| MenuItem2 | 系统信息 |
| MenuItem3 | 帮助 |
| MenuItem4 | 登出 |
在【通讯录】这个MenuButton控件下添加2个MenuItem控件,分别设置其属性如下:
| 控件 | caption |
|---|---|
| MenuItem1 | 企业联系方式 |
| MenuItem2 | 所有联系人 |
在【基础数据维护】这个MenuButton控件下添加2个MenuItem控件,分别设置其属性如下:
| 控件 | caption |
|---|---|
| MenuItem1 | 企业基础数据维护 |
| MenuItem2 | 员工基础数据维护 |
最终显示如下图所示:

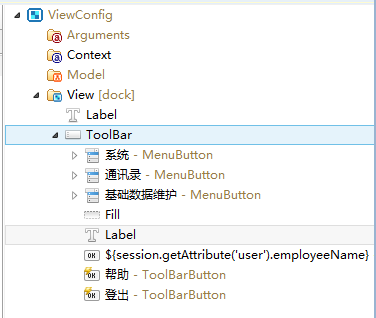
接下来需要在ToolBar的右侧放置欢迎用户信息,帮助和登出的快捷按钮,我们首先在ToolBar的内部添加一个Fill控件,这样无论浏览器窗口的大小如何变化,右侧放置的控件始终固定在ToolBar的右侧。
如下图所示:

先加入欢迎用户信息
在ToolBar控件内部添加一个Label,设置控件属性如下:
| 属性 | 值 | 说明 |
|---|---|---|
| text | 欢迎您! | 标签控件显示的文本 |
再添加一个ToolBarButton控件,设置控件属性如下:
| 属性 | 值 | 说明 |
|---|---|---|
| caption | ${session.getAttribute('user').employeeName} | Button控件显示的标题 |
| icon | url(>skin>common/icons.gif) -140px -100px | Button控件显示的图标 |
再加入帮助快捷按钮
在ToolBar控件内部添加一个ToolBarButton控件,设置控件属性如下:
| 属性 | 值 | 说明 |
|---|---|---|
| caption | 帮助 | Button控件显示的标题 |
| icon | url(>skin>common/icons.gif) -180px -0px | Button控件显示的图标 |
最后加入登出快捷按钮
在ToolBar控件内部添加一个ToolBarButton控件,设置控件属性如下:
| 属性 | 值 | 说明 |
|---|---|---|
| caption | 登出 | Button控件显示的标题 |
| icon | url(>skin>common/icons.gif) -180px -120px | Button控件显示的图标 |
最终显示如下图:
步骤4:添加并配置IFrame
现在需要为主页面添加工作区,在【ViewConfig】节点下的【View】节点下添加一个IFrame控件,设置控件属性如下:
| 属性 | 值 | 说明 |
|---|---|---|
| id | iframeMain | 控件的Id |
步骤5:为控件绑定事件
设置完控件属性后,需要为MenuItem和快捷按钮绑定onClick事件,在点击菜单或者按钮时,给IFrame的path属性赋值,使之能够显示指定的页面。
鼠标选中【欢迎】MenuItem控件,切换到Client Events事件列表,在onClick事件上增加iframeMain参数,在onClick事件编辑区中输入如下代码:
iframeMain.set("path","com.bstek.dorado.sample.standardlesson.junior.system.Welcome.d");
鼠标选中【系统信息】MenuItem控件,切换到Client Events事件列表,在onClick事件上增加iframeMain参数,在onClick事件编辑区中输入如下代码:
iframeMain.set("path","com.bstek.dorado.sample.standardlesson.junior.system.SystemInfo.d");
鼠标选中【帮助】MenuItem控件,切换到Client Events事件列表,在onClick事件上增加iframeMain参数,在onClick事件编辑区中输入如下代码:
iframeMain.set("path","http://wiki.bsdn.org");
鼠标选中【企业联系方式】MenuItem控件,切换到Client Events事件列表,在onClick事件上增加iframeMain参数,在onClick事件编辑区中输入如下代码:
iframeMain.set("path","com.bstek.dorado.sample.standardlesson.junior.contacts.CompanyInfo.d");
鼠标选中【所有联系人】MenuItem控件,切换到Client Events事件列表,在onClick事件上增加iframeMain参数,在onClick事件编辑区中输入如下代码:
iframeMain.set("path","com.bstek.dorado.sample.standardlesson.junior.contacts.AllContacts.d");
鼠标选中【企业基础数据维护】MenuItem控件,切换到Client Events事件列表,在onClick事件上增加iframeMain参数,在onClick事件编辑区中输入如下代码:
iframeMain.set("path","com.bstek.dorado.sample.standardlesson.junior.base.CompanyManage.d");
鼠标选中【员工基础数据维护】MenuItem控件,切换到Client Events事件列表,在onClick事件上增加iframeMain参数,在onClick事件编辑区中输入如下代码:
iframeMain.set("path","com.bstek.dorado.sample.standardlesson.junior.base.EmployeeManage.d");
鼠标选中【帮助】ToolBarButton控件,切换到Client Events事件列表,在onClick事件上增加iframeMain参数,在onClick事件编辑区中输入如下代码:
iframeMain.set("path","http://wiki.bsdn.org");
到目前为止,View部分设置完毕。