在本节中我们在表格最左边增加多选框,在表格中选择多个员工,点击计算员工生肖按钮,则计算相关员工属相。
步骤1:拷贝视图并修改名称
将 com.bstek.dorado.sample.standardlesson.middle.base目录下的 EmployeeManageForCustomRender.view.xml拷贝到当前目录并重命名为 EmployeeManageForCustomSubmit.view.xml。
步骤2:修改DataGrid配置
鼠标选中【datagridEmployee】,设置其属性如下:
| 属性 | 值 | 说明 |
|---|---|---|
| selectionMode | multiRows | DataGrid在加入RowSelectorColumn后选择模式设置。 此属性具有如下几种取值:
|
为其添加一个RowSelectorColumn,拖动新增的DataColumn到最上方,如下图所示:

接下来需要为其添加一个DataColumn,拖动新增的DataColumn到【email】下方,设置属性如下:
| 属性 | 值 | 说明 |
|---|---|---|
| name | animal | DataColumn的属性名 |
| property | animal | DataColumn的属性名 |
| align | center | DataColumn数据对齐方式 |
如下图所示:

步骤3:新增并配置UpdateAction
保存用户属相信息需要添加UpdateAction控件,在【ViewConfig】节点下的【View】节点下添加UpdateAction控件,设置控件属性如下:
属性 | 值 | 说明 |
|---|---|---|
| id | updateactionSaveForSelect | 控件的Id |
| dataResolver | employeeService#saveAll | 通过执行employeeService这个bean中的saveAll方法对传递到后台的数据进行持久化 |
| executeMessage | 正在保存... | 当此Action正在执行时希望系统显示给用户的提示信息 |
| successMessage | 保存成功! | 当此Action执行成功之后自动提示的信息。 |
然后为UpdateAction添加子节点UpdateItem,绑定需要提交的DataSet数据集:
鼠标选中updateactionSaveForSelect,在右侧【Dorado7 ToolBox】工作区的【Others】分类下面双击【UpdateItem】,设置属性如下:
属性 | 值 | 说明 |
|---|---|---|
| dataSet | datasetEmployee | 实现DataSet数据采集,一个UpdateAction可以添加多个UpdateItem |
界面如下图所示:

接下来需要给【updateactionSaveForSelect】绑定onGetUpdateData事件,这个事件是当UpdateAction尝试获取每个UpdateItem对应的提交数据时触发的事件。简而言之就是在此事件中能自定义提交数据。在onGetUpdateData事件编辑区中输入如下代码:
function getAnimal(year) {
    if (year=='' || year==undefined){
            return;
    }
    var s = Math.abs((year-1900)%12);
    switch(s){
            case 0: animal = '鼠';break;
            case 1: animal = '牛';break;
            case 2: animal = '虎';break;
            case 3: animal = '兔';break;
            case 4: animal = '龙';break;
            case 5: animal = '蛇';break;
            case 6: animal = '马';break;
            case 7: animal = '羊';break;
            case 8: animal = '猴';break;
            case 9: animal = '鸡';break;
            case 10: animal = '狗';break;
            case 11: animal = '猪';break;
            default: return;
    }
    return animal;
}
var entityList = view.get("#datagridEmployee.selection");
entityList.each(function(entity){
    var birthday = entity.get("birthday");
    var year= new Date(birthday).formatDate("Y");
    entity.set("animal",getAnimal(year));
});
arg.data = entityList;
步骤4:新建并配置ToolBarButton
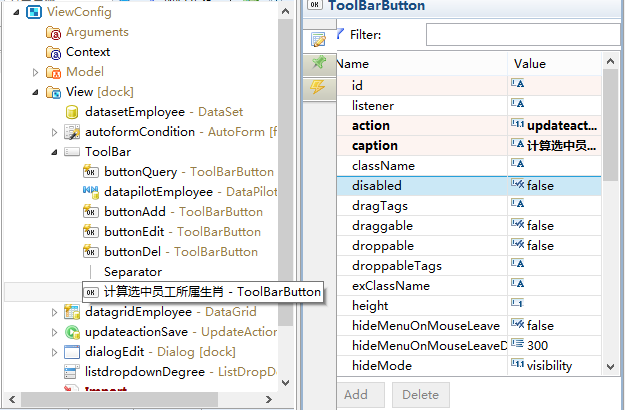
鼠标选中【ToolBar】控件,首先新建一个【Separator】控件,使之作为分隔符,将即将新建的ToolBarButton和前面的操作按钮隔开,接下来新建一个【ToolBarButton】控件,设置控件属性如下:
| 属性 | 值 | 说明 |
|---|---|---|
| caption | 计算选中员工所属生肖 | ToolBarButton控件显示的标题 |
| action | updateactionSaveForSelect | 设置ToolBarButton绑定的action |
| icon | url(>skin>common/icons.gif) -100px -20px | 设置ToolBarButton的图标 |
如下图所示:

到目前为止,View部分设置完毕,接下来我们查看运行效果。