从本章开始我们将开发中级教程相关功能,因此需要新建中级教程Package。
步骤1:在项目中创建com.bstek.dorado.sample.standardlesson.middle.person包
步骤2:在com.bstek.dorado.sample.standardlesson.middle.person目录下新建View,将View命名为MyInfo.view.xml。
步骤3:新建并配置DataType
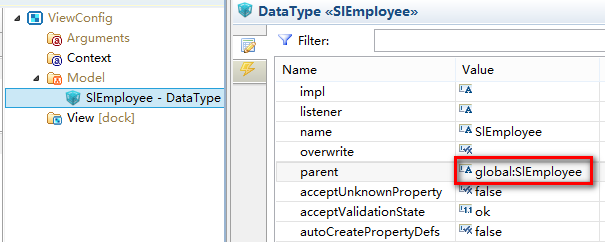
在【ViewConfig】节点下的【Model】节点下添加一个DataType,设定DataType的属性如下:
属性 | 值 | 说明 |
|---|---|---|
| name | SlEmployee | DataType的名称 |
设定此DataType的parent属性为models目录中Common.model.xml中配置的SlEmployee,使之继承公共DataType:
在当前DataType下新增5个PropertyDef,propertyDef1~propertyDef5,分别设置propertyDef的属性如下:
PropertyDef | name | label |
|---|---|---|
| propertyDef1 | employeeCode | 员工编号 |
| propertyDef2 | employeeName | 姓名 |
| propertyDef3 | 电子邮件 | |
| propertyDef4 | phone | 座机 |
| propertyDef5 | mobile | 移动电话 |
接下来选中mobile这个propertyDef,设置其属性如下:
| 属性 | 值 | 说明 |
|---|---|---|
| required | true | 允许字段是否非空 |

步骤3:新建并配置DataSet
在【ViewConfig】节点下的【View】节点下添加一个DataSet控件,设定DataSet的属性如下:
属性 | 值 | 说明 |
|---|---|---|
| id | datasetEmployee | 控件的Id |
| dataType | [SlEmployee] | DataSet的数据类型 |
| dataProvider | employeeService#getEmployeeByUserName | 由employeeService这个bean中的getEmployeeByUserName方法为DataSet提供数据加载服务 |
| parameter | ${session.getAttribute('user').userName} | 装载数据时使用的参数,及传递给数据提供器的参数。 |
界面如下图所示:

步骤4:新建并配置AutoForm
接下来新建一个AutoForm用于展示用户信息,在视图中添加AutoForm控件,设定AutoForm的属性如下:
属性 | 值 | 说明 |
|---|---|---|
| id | autoformEmployee | 控件的Id |
| dataSet | datasetEmployee | AutoForm绑定的数据集 |
| width | 600 | AutoForm的宽度 |
| labelSeparator | : | AutoForm Element中标签和输入框间的分隔符 |
【鼠标右键】点击autoformEmployeee控件,在弹出菜单中选择【Generate AutoForm Elements】,生成相关字段,调整显示顺序和多余的AutoForm Element,最终结果如下图:

由于在此表单中,除了移动电话字段可编辑外其他字段只读,因此需要设置其他字段的readOnly属性,设置属性如下:
| AutoForm Element | readOnly |
|---|---|
| employeeName | true |
| employeeCode | true |
| true | |
| phone | true |
步骤5:新增并配置UpdateAction控件
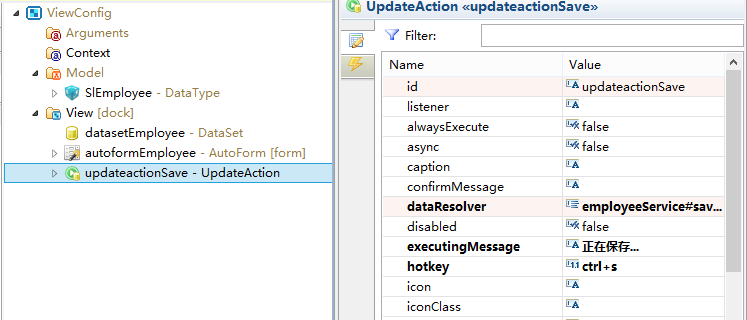
由于有持久化操作因此需要新增UpdateAction控件,鼠标选中【View】节点,在当前View下新增UpdateAction控件,设置UpdateAction属性如下:
属性 | 值 | 说明 |
|---|---|---|
| id | updateactionSave | 控件的Id |
| dataResolver | employeeService#saveAll | 通过执行employeeService这个bean中的saveAll方法对传递到后台的数据进行持久化 |
| executeMessage | 正在保存... | 当此Action正在执行时希望系统显示给用户的提示信息 |
| successMessage | 保存成功! | 当此Action执行成功之后自动提示的信息。 |
| hotkey | ctrl+s | 执行此Action的热键 |
然后为UpdateAction添加子节点UpdateItem,绑定需要提交的DataSet数据集:
鼠标选中updateactionSave,在右侧【Dorado7 ToolBox】工作区的【Others】分类下面双击【UpdateItem】,设置属性如下:
属性 | 值 | 说明 |
|---|---|---|
| dataSet | datasetEmployee | 实现DataSet数据采集,一个UpdateAction可以添加多个UpdateItem |
界面如下图所示:
步骤6:添加并配置Container控件
在【ViewConfig】节点下的【View】节点下添加一个Container控件,设置控件属性如下:
| 属性 | 值 | 说明 |
|---|---|---|
| width | 550 | 容器控件的宽度 |
| height | 50 | 容器控件的高度 |
将右侧工作区切换到Layout属性设置区中,如下图所示:
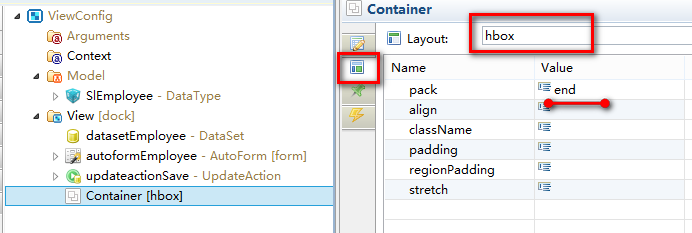
将Container控件的Layout属性设置为hbox,并将pack属性设置为end。
步骤7:添加并配置Button控件
接下来我们需要在容器控件中添加Button控件。
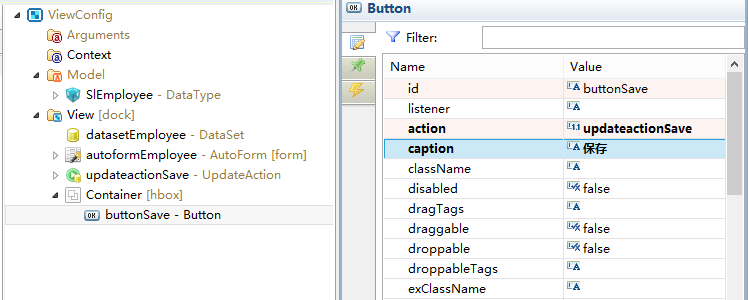
鼠标选中Container控件,向控件内部增加1个Button控件,设置其属性如下:
| 属性 | 值 | 说明 |
|---|---|---|
| id | buttonSave | 控件的Id |
| caption | 保存 | Button控件显示的名称 |
| action | updateactionSave | 点击按钮执行的Action操作 |
设置完毕后如下图所示:
到目前为止,View部分控件属性设置完毕,接下来开始准备后台服务部分。