概述
子窗体具备一下特性:可在运行期随意拖拽改变大小。支持最大化, 最小化, 还原, 隐藏等操作。支持排他式的显示模式, 可以模拟模态窗体的显示方式。本示例链接如下:
准备工作
新建一工程subwindow,无需配置数据源和数据库。
开发步骤
添加Button
步骤1:添加一Common ViewModel,文件名为SubWindow。
步骤2:在SubWindow的function中定义如下代码:
var serialNumber = 0;
var windows = new Array();
var exclusiveWidnow = null;
步骤3:添加一Button,属性设置如下:
属性 | 值 |
|---|---|
id | buttonNewWindow1 |
value | 添加随机定位子窗体 |
为buttonNewWindow1的onClick事件添加如下代码:
var contarner = document.getElementById("windowContainer");
for (var i = 0; i < 3; i++) {
  var win = DoradoFactory.create("SubWindow");
  win.setTitle("新的子窗体" + (++serialNumber));
  win.style.position = "absolute";
  win.style.width = 300;
  win.style.height = 100;
  win.style.left = Math.random() * (contarner.offsetWidth - 300);
  win.style.top = Math.random() * (contarner.offsetHeight - 100);
  win.setShowCloseButton(true);
  win.activate();

  var color = Math.round(Math.random() * Math.pow(16, 6)).toString(16);
  if (color.length < 6) {
    for (var j = color.length; j < 6; j++) color += "0";
  }
  win.getContentContainer().style.backgroundColor = "#" + color;

  contarner.appendChild(win);
  EventManager.addDoradoEvent(win, "afterHide", function(subWindow) {
      subWindow.destroy();
    }
  );

  windows.push(win);
}
步骤4:添加一Button,属性设置如下:
属性 | 值 |
|---|---|
id | buttonNewWindow2 |
value | 添加流式布局子窗体 |
为buttonNewWindow2的onClick事件添加如下代码:
var contarner = document.getElementById("windowContainer");
var win = DoradoFactory.create("SubWindow");
win.setTitle("新的子窗体" + (++serialNumber));
win.style.width = 300;
win.style.height = 100;
win.setShowCloseButton(true);
win.activate();
var color = Math.round(Math.random() * Math.pow(16, 6)).toString(16);
if (color.length < 6) {
  for (var i = color.length; i < 6; i++) color += "0";
}
win.getContentContainer().style.backgroundColor = "#" + color;
contarner.appendChild(win);
EventManager.addDoradoEvent(win, "afterHide", function(subWindow) {
    subWindow.destroy();
  }
);
windows.push(win);
步骤5:添加一Button,属性设置如下:
属性 | 值 |
|---|---|
id | buttonCloseAll |
value | 关闭所有子窗体 |
为buttonCloseAll的onClick添加如下代码:
for (var i = 0; i < windows.length; i++) {
	 var win = windows[i];
	 win.hide();
}
windows = new Array();
步骤6:添加一Button,属性设置如下:
属性 | 值 |
|---|---|
id | buttonShowExclusiveWindow |
value | 显示一个排他子窗体 |
为buttonShowExclusiveWindow的onClick事件添加如下代码:
if (exclusiveWidnow == null) {
  exclusiveWidnow = DoradoFactory.create("SubWindow", null, null, "hidden");
  exclusiveWidnow.setTitle("排他式子窗体");
  exclusiveWidnow.style.position = "absolute";
  exclusiveWidnow.style.width = 300;
  exclusiveWidnow.style.height = 200;
  exclusiveWidnow.setShowMinimizeButton(false);
  exclusiveWidnow.setShowCloseButton(true);
  exclusiveWidnow.setResizable(false);
  exclusiveWidnow.activate();
  document.body.appendChild(exclusiveWidnow);

  EventManager.addDoradoEvent(exclusiveWidnow, "beforeHide", function(subWindow) {
      if (!confirm("确实要关闭吗?")) {
        throw new AbortException();
      }
    }
  );
}
exclusiveWidnow.show(true, true);
创建Jsp页面
生成Jsp页面以后再编辑一下布局,最后结果如下:
<%@ page contentType="text/html; charset=UTF-8" %>
<%@ taglib uri="http://www.bstek.com/dorado" prefix="d" %>
 <html>
 <body style="margin: 0; overflow: hidden">
 <d:View config="SubWindow">
 <d:Layout type="border" padding="0">
 <d:Pane position="top">

 <d:SubWindow id="windowToolbar" title="操作按钮" width="100%"
draggable="false" resizable="false" showMinimizeButton="true"
showMaximizeButton="true" showCloseButton="false">
 <d:Button id="buttonNewWindow1" />
 <d:Button id="buttonNewWindow2" />
 <d:Button id="buttonCloseAll" />
 <d:Button id="buttonShowExclusiveWindow" />
 </d:SubWindow>
 </d:Pane>
 <d:Pane position="center">

 <d:SubWindow id="windowContent" title="工作区" width="100%"
height="100%" draggable="false" resizable="false"
showMinimizeButton="false" showMaximizeButton="true"
showCloseButton="false">
 <div id="windowContainer" style="width: 100%; height: 100%; overFlow: auto">
 </div>
 </d:SubWindow>
 </d:Pane>
 </d:Layout>
 </d:View>
 </body>
 </html>
查看运行效果
启动服务器后,浏览效果如下:
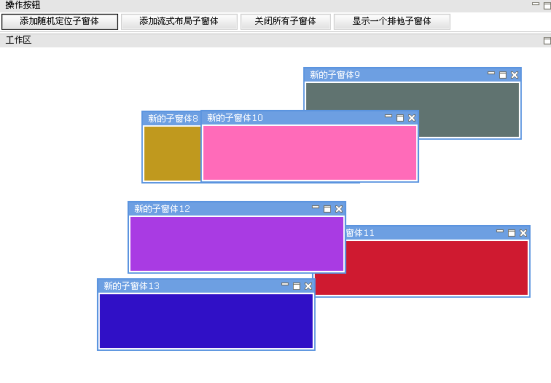
可以通过页面上部的四个Button进行相关操作。
知识点
本示例知识点主要是SubWindow。关于SubWindow,可以参考《dorado 5 组件详解 1.1》的第二部分C部分的第1节。